Showing posts with label woodworking. Show all posts

Friday, March 14, 2014

Spring Cleaning 2014 Indoor Projects

With the warmer weather starting to finally thaw our frosty demeanor, the inevitable spring cleaning projects have begun. Since the ground still has some snow cover, hence there is still a frost line, the current projects are all indoors. Later on this spring, I should have some information on outdoor projects that will be happening. And let me tell you, there is a long list.

The first project that was tackled was prompted by yet another microwave dying on us. It is always fun to turn on the microwave and have blue light from electrical arcing light up the kitchen and hear noises normally associated from scenes in Frankenstein Monster movies. Hmmm... does that make me Dr. Frankenstein, or Igor? Moving on.

Our kitchen has a little desk as part of the design, and we originally had the microwave set there. With this new setup, as shown in the picture, we moved the microwave over, to the adjacent counter. This required Kristen cleaning up the pile of paperwork, toys, books, and other miscellaneous junk stored there. I think we ended up only keeping 1/100th of the stuff that was stored there. Okay, maybe 1/10th.

My addition to the desk was to make the shelves. I took some more of that cheap melamine particle board I picked up from the Menards discount rack, and created what you see here. I still need to put some iron-on edge banding, but so far, we are absolutely loving how this is working out. The kids school iPads are now off the breakfast bar when charging, and I have a place to put my keys/wallet/phone when I get home that is out of the way.

Another project was to remove the upright piano we had in our living room area, as we have hardly used it since we acquired it. It was a free piano that we received a few years ago, but essentially failed to use. My guess is that to have it tuned up and put back into a state of true usefulness was going to cost way more than it was worth. And so, it was dismantled, piece by piece.

Most of the teardown was actually pretty easy, which really surprised me. For a short while, I thought this was going to be one of my easier projects. Well, once I hit the soundboard, my theory fell apart. In the picture, I am working on removing some components so I can get to the screws that hold the cast iron plate that holds the strings. At this point I had already cut the piano strings out. Tristen, looking oh so manly, was tearing apart the bench.

After removing the metal, I started into tearing apart the sound board. This took a considerable amount of energy, as it was fairly well constructed. When I started thinking about this project, I was thinking I could reclaim much of the wood. However, it appears that it was made from veneered pine for the most part, so pretty much useless. The only pieces I think I may be able to salvage are the six posts that strengthened the sound board on the back. They look to be solid hardwood, and my be useful in building my next set of bunkbeds.

Once we finish our demolition, we cleaned up, moved the sofa back 6 inches, put in a storage shelf, repositioned the TV and TV stand, and moved a bookshelf. The final result was a much more open and organized living space. Hopefully the picture helps for those who have been to our house.

So those have been the major indoor Spring clean up tasks so far this year.

Saturday, March 1, 2014

Wheat Cleaner 1.0

The Wheat Cleaner 1.0

Introducing, the Wheat Cleaner 1.0!

As some may know, we like to grind our own wheat in the Perreault household. Before grinding (or in the case of our flour making machine, impacting), the wheat kernels must be cleaned. Before going on, I know many people call them wheat berries, but for some reason, I just can't latch on to that nomenclature. Moving on...

Cleaning really just consists of separating the chaff and dried grasshoppers and beetles that are remaining in the wheat I get from my parents' farm in Minnesota. Now if that last statement grossed you out, get over it. Do you really want to know what is allowed to go into your store-bought processed food? Well, do you? Didn't think so. Besides, I told you the Wheat Cleaner 1.0 is used to remove it, so no harm done. Right? Although I'm sure the bugs would be a good source of protein!

My previous cleaning method was pretty much medieval. I would pour buckets of wheat back and forth in the breeze (or use my own hot air) to remove the undesired particulate. This worked well enough for small batches of wheat. But lately, we've been using much larger quantities (we have a lot of growing boys you know!), and a more time efficient method of cleaning was required.

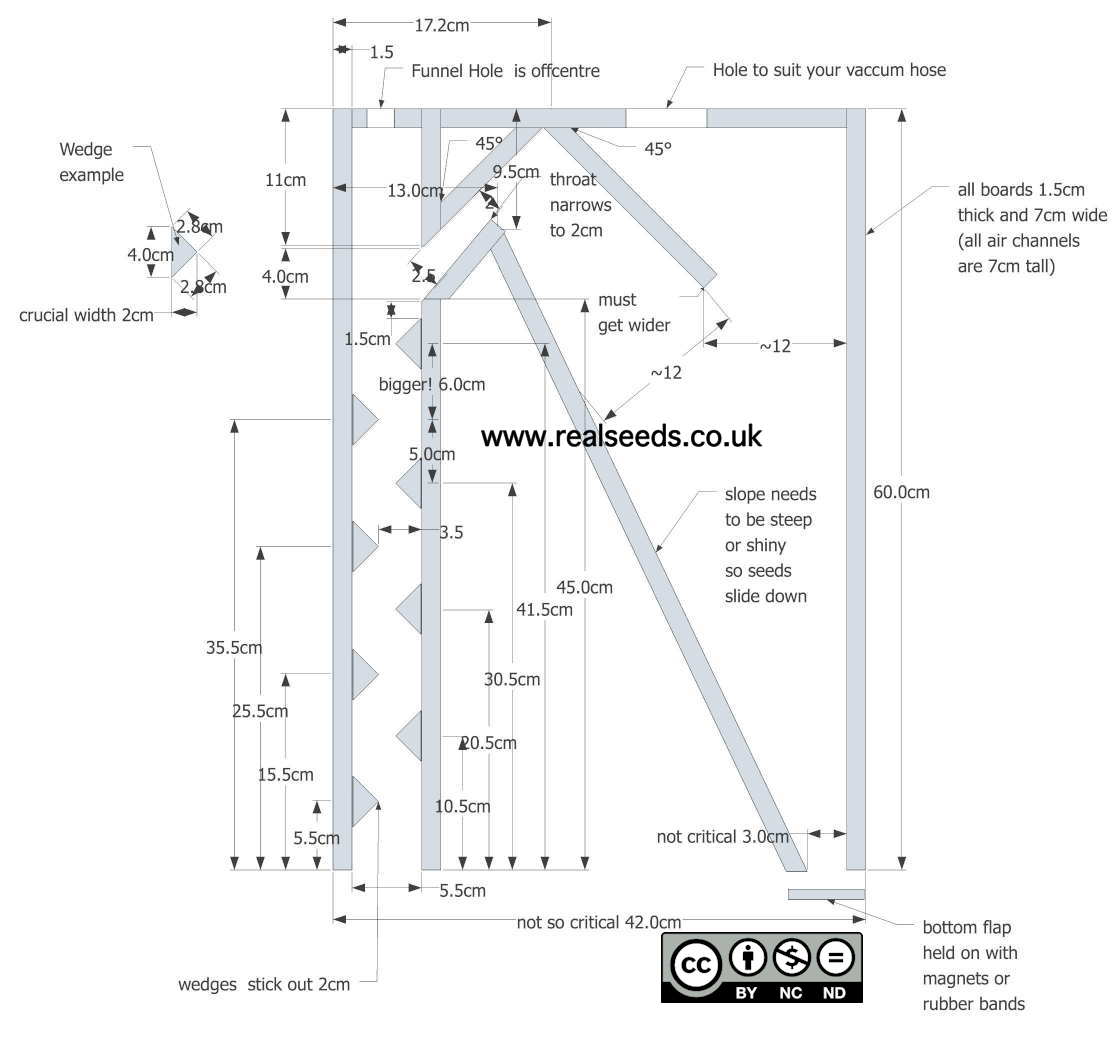
So, hopping on the internet, I searched for solutions. Most grain cleaning solutions were geared towards industrial usage, and not necessarily what I was looking for. They were expensive and bulky, and not suited for my home use task. Then I started finding contraptions that were being used to sort seeds. Both for agricultural purposes, and for bird feeding purposes. I ended up building a unit based on the plans at http://www.realseeds.co.uk/seedcleaner.html. The following is an image of the open source plans they provided.

The unit uses a shop-vac to create an updraft, thereby allowing the heavier wheat kernels to pass through a vertical separation chamber, and the lighter weed seeds and chaff to be sucked out. The vertical separation chamber has a series of flow disrupters, which I'll refer to as 'plinkos'. There is a draft control on the front that allows the amount of updraft to be varied for fine tuning the separation. The current design works well if I control the inflow of raw material. If too much wheat enters the vertical chamber, the suction increases due to the decrease in the chamber cross-sectional area, and most of the wheat gets pulled into the waste collection area. So, one of my improvements is to create some sort of intake flow control.

The completed unit is about 24 inches tall, by 17 inches wide. The depth is about 3 inches. The side walls are made from pieces of melamine covered particle board. I used one 48"x11"x3/4" piece of the this material for the entire unit, which cost me $2.29 at Menard's. For the top and bottom, I used 1/4 inch hardboard, which I picked out of a dumpster at a construction site. And the clear plastic covering the separation chamber was laying around my house. So, so far, the total material cost has been $2.29 plus the cost for some screws.

Monday, February 24, 2014

Why I Work Wood

How much wood could a wood chuck chuck if a wood chuck could chuck wood?
He'd chuck what wood a wood chuck could chuck if a wood chuck could chuck wood.

I've always liked that little rhyme. But, onto the real reason for this post. Why do I work with wood. The reasons are many, and looking back in time, they are a lot different then I initially thought. Let me start with the reason I went full 'bore' into woodworking.

The event that drove me into eventually sinking investing thousands of dollars on tools was when we needed to update the beds we had for our oldest two boys. As all good consumer driven people do, my wife and I went shopping! And so, we went looking around at the various furniture stores, trying to find a set of bunk beds that appealed to us. What ensued was what essentially ended up being an exercise in futility. Maybe we had too high of expectations, or maybe we'd been conditioned to expect cheap prices for decent quality, or maybe it was something else. What we felt we were finding were overpriced pieces of shoddily built things passed off as furniture. We even tried going to an "Oak" furniture store, thinking maybe at least the structural construction would be better. The prices were even more outrageous, and there were no bunk beds to be found. So, given the can-do spirit of my upbringing, I decided to build my own. I purchased a contractor table saw, benchtop drill press, benchtop jointer, and a few router bits. With tools and a set of plans in tow, I went forward with building the beds.

This is where the looking back says my interest started earlier than this point, as I already had a few tools such as a router and other miscellaneous tools. But this project spawned a much more focused thought process. I had it in my head to never walk into a furniture store again. So, far, I've been able to completely avoid them.

One of the things I learned from that first major project is to never buy hardwood from a box store (Menards, Home Depot, Lowes, etc). Granted, the wood was fine to work with, and I probably saved a lot of time as I didn't have to mill much of it, but my goodness was it expensive. I think I spent around $800 on the lumber alone. I think I've been able to build similar beds for half that cost by milling lumber purchased from a local sawmill. But, that point doesn't really fit into this narrative. Oh well, moving on.

When I completed those beds, I have to say I was quite pleased with myself. They were sturdy, they looked great, and I couldn't help but think that for around $1500 (tools and materials) I had created two beds that would sell at a furniture store for thousands of dollars each. Although I've also come to realize that I'm using time in building furniture, so the 'savings' are somewhat debatable.

That project started a string of projects that never cease to end, as well as a spending spree on tools. I might be able to count up all the beds I've made, but I really haven't tried to keep track anymore. In fact at this time, I have three more beds I really need to get done soon. I've made a dining room table to fit our family. Numerous cabinets and shelves. Night stands, knick knacks, and quite a few toy swords and other miscellaneous toys for the boys to play with.

When I was thinking of writing this post, those beds were what I thought drove me to woodworking. They definitely catapulted the time and money invested, but I think the desire was from much further back, and from much deeper within. Looking back, I think I started down this path much earlier.

When our first son was born, I had the urge to build something for him. So, with some pre-cut pine boards, a drill, circular saw, and a router, I put together a changing table. Currently it is being used as the base for a desk for our boys.

In college, I designed and built my loft. The lumber I used went through a few transformations depending on the location and type of bed. But, between studying, chasing girls, working, and chasing girls, there wasn't much time for building stuff.

And growing up, I always seemed to be wanting to build something. A playhouse using the lumber laying around the farm. A tree house. A go-cart. With ample tools, materials, and time available during the summer, that is usually what I tried to do. Most of my creations only got half built. Most were pretty ugly. But I definitely learned how to appreciate doing something yourself. It has been very hard over the years to realize that I can indeed do anything I want, but I don't have the time to do it all. I have to be choosy and prioritize.

I'm guessing that this drive to build things was what led me to engineering. And for a while it used to surprise me at how many engineers that I work with are also woodworkers. Not so much anymore though. We engineers need to build things, and the environment for engineers at Rockwell Collins where I work is more about paperwork than design. Woodworking provides that outlet to build and create for us desk jockeys.

This has been more of a philosophical history lesson then anything else. Therapeutic in some ways. Maybe that is the point of this blog altogether.

Wednesday, February 19, 2014

A Few Recently Completed Projects

Here are a few projects I've completed lately that I have a pictures of. Enjoy!

iPad Holder
iPad Holder
This project was completed for St Joseph Catholic School, where my kids attend. The school has been purchasing a lot of new computer equipment, and was in need of a place to hold a number of new iPads when charging. The resulting cabinet holds 16 iPads, and is constructed from 3/4 inch oak plywood, reclaimed oak flooring for the trim and edging, and 1/4 inch hardboard dividers. The piece was finished with a wipe-on polyurethane (picture is of the unfinished version).
Family Cross

Family Cross
As part of Catholic Schools Week last month, families were invited to share family crosses. My wife came up with the basic design (the puzzle pieces), and then I built it using scrap chunks of wood. Good thing I hardly throw out any wood! The backer is piece of 3/4 inch oak plywood, and the various puzzle pieces of the cross are made from purple heart, cherry, walnut, spalted maple, leopoardwood, and red oak. A wipe-on polyurethane was used to finish the project.

We put together the following as an explanation of the cross:
The Perreault Family Cross:
We are 8 individual pieces to a puzzle. Put together to form a family. Working together to follow God's path for us: to show His love to all we meet.


Handheld Crosses
Handheld Crosses
These handhold-able crosses are for a Lenten project one our boys is going to do. The request was put out by the teacher for small crosses, and of course my wife volunteered my services! They are simple lap-type joint construction, about 3 inches high, and about 2 inches wide. The wood used was reclaimed oak flooring.