Showing posts with label cooking. Show all posts

Tuesday, March 18, 2014

Rolling Out the Dough

Much of this past weekends activities revolved around food. So much for this blog being about woodworking...

And speaking of food blogs, my friend Jake is working on his own food blog, which you can find at http://jakesbbqandfood.blogspot.com/. I'm really looking forward to seeing what he's going to cook up this Summer with his new smoker/grill!

So Sunday morning, I made a large batch of waffles. This is another recipe that I use our ground wheat for, and the resulting waffles have a absolutely delicious "earthy" flavor. Since I have yet to modify this recipe and make my own version, I am willing to share this one! (Alton Brown Basic Waffle Recipe)

Sunday evening, I went forward with my plan to make homemade pasta. When going into this, I actually was pretty excited, as it always seems that freshly made pasta is the best thing since sliced bread when watching cooking shows. So with enthusiasm brimming, I set forth, again following the sage advice of Mr. Brown.

With six kids to feed, I made two batches of dough. For the first batch, I tried to use the method of mixing the egg/water mixture with the flour as I'd seen on those TV cooking shows. Where you create a 'volcano' shape with the flour, pour in the egg/water mix, and combine the two with your fingers. Well, let's just say I have a bit of practice to do on that method. My volcano erupted onto the counter, beginning my first round of frustration. I was able to take all the flour and soak up the liquids that were spreading, and created a very homely looking ball of dough-like substance. I put the ball of whatever into a plastic bag and into the fridge.

For the second batch, I decided to follow the advice my wife had given me on the first batch, by putting the ingredients in a large bowl. After my volcanic eruption, I decided to not be so stubborn in trying to mimic the professional chefs on TV. The results were much cleaner! And I think I got the dough ball to form in a much more correct way, as my fingers wound up the egg/water and flour mixture into a yellow dough. However, I did not incorporate anywhere near enough flour, which became an issue later. This dough ball also went into a plastic bag and into the refrigerator.

Later in the afternoon, I began prepping for supper. The rest of the menu included a garlic tomato sauce for the pasta, asparagus and elk steak. The steak was marinated in a balsamic vinegar and Worcestershire sauce mixture for a couple of hours. The asparagus was snapped in preparation for being sauteed in butter. The garlic was peeled, and the onions sweated. Next, I needed to make some noodles.

Okay, so already being a bit frustrated with my dough making performance, I was hoping to make up for that with the dough rolling. We have a pasta maker, so I figured this would go pretty smoothly. Well, to make a long story a little longer, you run it through pasta rollers. Sorry, had to do it. Anyway, I started with the first batch of dough. You know, the dough like substance. Well, after sitting in the chill box for a while, the dough actually looked pretty good. And it rolled out through the pasta machine decently as well! Sweet! But I will say this. This is not a task for those in a hurry. It is a tedious, time consuming, messy task. And the noodle cutting portion of the pasta roller did not function as well as expected, making the task of creating strands of pasta dough take even longer.

After enlisting the help of my lovely wife, so we would be able to eat sometime this week, I started rolling out the second batch of dough, while she cooked the first, and kept an eye on all the other items. As we were doing this, Kristen noted that we should have thought through the menu a bit more, as the there was absolutely no room on our stove due to three sauce pans and a large pot of water all competing for space. But now on to the issues with the second batch of pasta dough.

Remember how I said I didn't incorporate nearly enough flour into the dough? Well, yeah, that was a problem. The dough may have looked prettier to begin with, but it was an absolutely sticky ball of goo later when I was trying to roll it out. So, lots of flour was brought into play, creating a huge mess, and getting me even more frustrated. Eventually, all the dough was flattened, sliced, and boiled. Ugh!

It was so good I had to eat some before taking a picture!
So how did it all taste? Well, the pasta was very good. Much more tender than your standard dry pasta in a box. I was really loving my garlic tomato sauce, but most of the kids complained about it being to 'spicy' from the garlic. I only used two whole cloves. I mean gee wiz, how else do we keep the vampires away. The steak had a great flavor to it, but for some reason was a little tough. The asparagus was very good, and with it being available is another sign that Spring is here!

I'll definitely be trying the pasta again some day. The dough making process is much more finicky than I expected, so it will take some time to figure out the texture I need to look for. But it will come to me at some point, and I may have to look into making whole wheat pasta as well.

Sunday, March 16, 2014

Book Review: Alton Brown's Gear for Your Kitchen

This is a book I purchased back in 2011 when Alton Brown made his way to Cedar Rapids during his "Inside Out with Alton Brown" tour. So, it is actually a signed copy. Kind of cool!

When I had him sign it, I told him how the boys and I had been watching his show "Good Eats" quite a bit. At one point, one of the boys gave Kristen a hard time as she was cooking, and said "That's not how Mr. Brown does it!" He chuckled a bit, and said I better straighten those boys out.

I already had his three books from the "Good Eats" TV show, so I had to buy something that he could sign, and I chose this one. I figured it would be good to have a book going over all the ins and outs of various cooking tools. And by golly, what man does not like having more tools!

So you might be asking, why are you reviewing this book now? Well, I started on the book waiting in line to have Alton autograph it. But then never got much further. I just finished the rest of the book today.

Me and Alton Brown, 2011
The book itself is the distillation of all the tips, tricks, philosophies, myths and favortism towards the equipment Alton uses, basically as seen on the show "Good Eats". It doesn't have the same whimsical feel as when he visits "W" on the show, and is more just about the facts. Honestly, there is so much good information, I will probably have to refer back to it often.

I haven't gotten around to going through the kitchen to purge un-needed items as he suggests in the book (for example, eliminate all uni-taskers such as a garlic press), but is it tempting. But if I really tried to follow his guidelines, I think Kristen would ban me from the kitchen. I guess I'll just keep finding ways to store more stuff via reorganizations and clever hacks.

Monday, March 10, 2014

It's Pizza Night!

In a previous post, I talked about the Wheat Cleaner 1.0. A device to help clean wheat more efficiently so we can enjoy foods made from wheat kernels. Not berries. Berries are tart fruits that grow on trees and bushes. Just wanted to make that clear. I wonder if I have to consult a food anthropologist to figure out how this berry nonsense started. Hopefully it isn't the same kind of story that caused tomatoes to be classified as a vegetable instead of a fruit by the government. But I digress. So this post is on one of the main foods we make with our wheat: homemade pizza.

The dough recipe I started with was based on using all-purpose flour, water, oil, sugar, salt, and yeast. While the proportions worked well for those ingredients, they did not work quite as well with the whole wheat flour. So, I've had to experiment some. The main variants were the proportion of whole wheat to all-purpose flour, and the amount of water to use in the dough. As well as the rise time.

Last week I think I finally got the balance correct. The resulting dough was stretchy and easily made into a pizza crust by hand. In the past, I would have to work the dough over pretty hard to get it to stretch out, usually resigning myself to use a rolling pin. Oh the horror! While the resulting crust always had an excellent taste, it had been hard to work with. This is no longer the case!

As you can see in the picture, my el'cheapo pizza peel is in pretty sad shape. It is cracking, peeling, and is a tad too thick in my mind. So, on my list of woodworking projects is a new pizza peel. Whenever I get around to making it, I'll be sure to post it here. Just thought I'd throw this paragraph in to tie this post to woodworking! I guess all things considered, the $15 pizza peel and pizza stone combo have served me pretty well.

So what kind of pizza do we make to feed our house full of boys? Rather than try to please them all, or rather force them to be happy with one or two types of pizza, we've gone down the personal pizza route. I end up breaking the pizza dough up into individual sized pizzas, which allows each of us create our own pizza flavor. We usually try to have two sauce choices, homemade red, and a white alfredo sauce. Then, depending on what we have around the house, we may have chicken, roasted garlic, elk/venison steak and/or burger, homemade venison sausage, mushrooms, peppers, onions (raw and caramelized), fresh basil, tomatoes, black olives, sauerkraut, pineapple, bacon, pepperoni, and my sisters suggestion, chopped pickles. Oh, and yes, also anchovies on occasion. Each pizza night there is a subset of that wide variety of toppings. I am probably forgetting a few, but you get the idea. Sky's the limit!

On to the big question at hand, at least in my mind. To share my recipe or not! Do you want to make your own whole wheat pizza? Do you want the recipe? Well, I think you'll just have to come over and join us for pizza night if you want it!

Saturday, March 1, 2014

Wheat Cleaner 1.0

The Wheat Cleaner 1.0

Introducing, the Wheat Cleaner 1.0!

As some may know, we like to grind our own wheat in the Perreault household. Before grinding (or in the case of our flour making machine, impacting), the wheat kernels must be cleaned. Before going on, I know many people call them wheat berries, but for some reason, I just can't latch on to that nomenclature. Moving on...

Cleaning really just consists of separating the chaff and dried grasshoppers and beetles that are remaining in the wheat I get from my parents' farm in Minnesota. Now if that last statement grossed you out, get over it. Do you really want to know what is allowed to go into your store-bought processed food? Well, do you? Didn't think so. Besides, I told you the Wheat Cleaner 1.0 is used to remove it, so no harm done. Right? Although I'm sure the bugs would be a good source of protein!

My previous cleaning method was pretty much medieval. I would pour buckets of wheat back and forth in the breeze (or use my own hot air) to remove the undesired particulate. This worked well enough for small batches of wheat. But lately, we've been using much larger quantities (we have a lot of growing boys you know!), and a more time efficient method of cleaning was required.

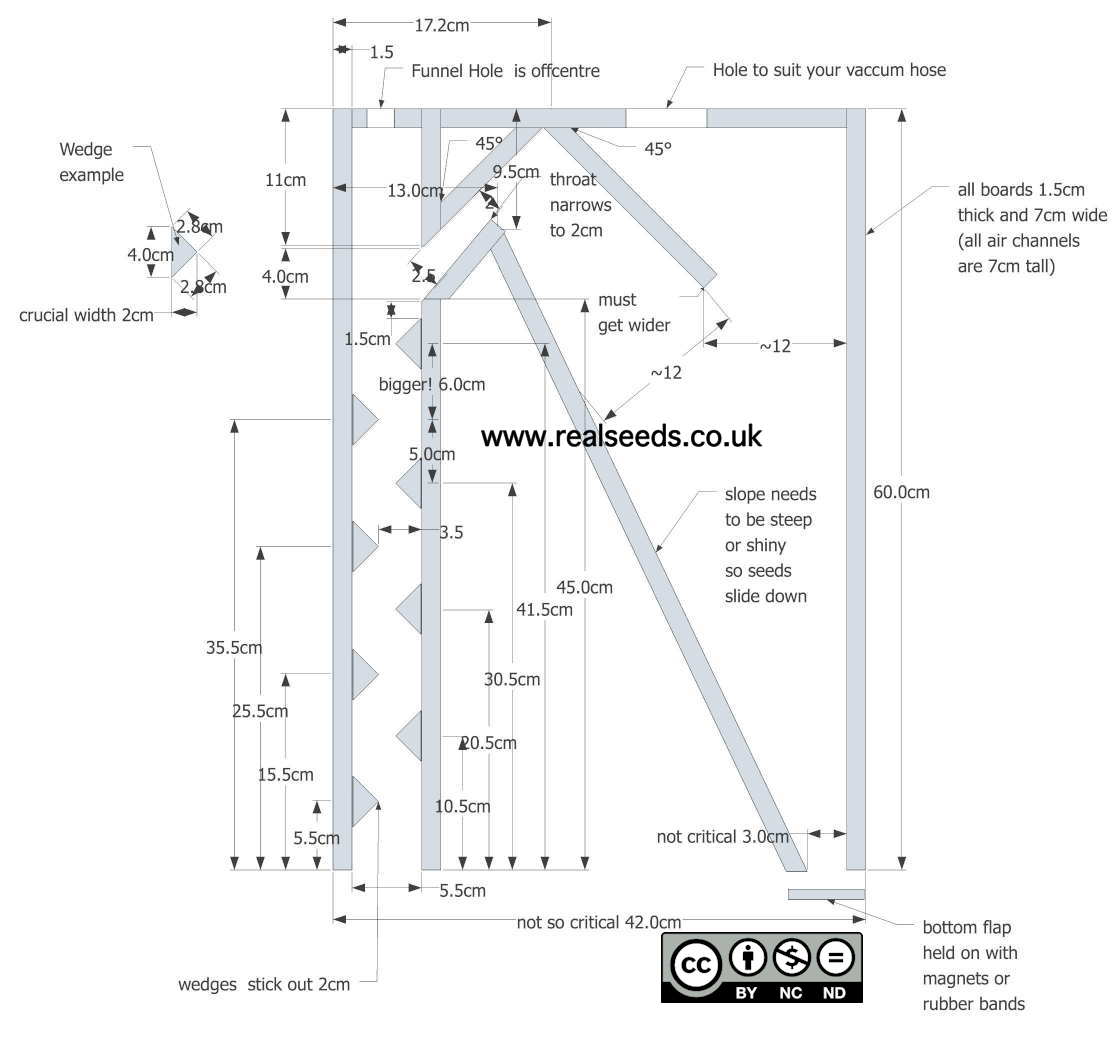
So, hopping on the internet, I searched for solutions. Most grain cleaning solutions were geared towards industrial usage, and not necessarily what I was looking for. They were expensive and bulky, and not suited for my home use task. Then I started finding contraptions that were being used to sort seeds. Both for agricultural purposes, and for bird feeding purposes. I ended up building a unit based on the plans at http://www.realseeds.co.uk/seedcleaner.html. The following is an image of the open source plans they provided.

The unit uses a shop-vac to create an updraft, thereby allowing the heavier wheat kernels to pass through a vertical separation chamber, and the lighter weed seeds and chaff to be sucked out. The vertical separation chamber has a series of flow disrupters, which I'll refer to as 'plinkos'. There is a draft control on the front that allows the amount of updraft to be varied for fine tuning the separation. The current design works well if I control the inflow of raw material. If too much wheat enters the vertical chamber, the suction increases due to the decrease in the chamber cross-sectional area, and most of the wheat gets pulled into the waste collection area. So, one of my improvements is to create some sort of intake flow control.

The completed unit is about 24 inches tall, by 17 inches wide. The depth is about 3 inches. The side walls are made from pieces of melamine covered particle board. I used one 48"x11"x3/4" piece of the this material for the entire unit, which cost me $2.29 at Menard's. For the top and bottom, I used 1/4 inch hardboard, which I picked out of a dumpster at a construction site. And the clear plastic covering the separation chamber was laying around my house. So, so far, the total material cost has been $2.29 plus the cost for some screws.

Monday, February 17, 2014

Revisiting an Old Deep Dish

While planning out our meals for last week, I had the idea to make something I haven't had since college: meat pie. And so, I went about planning what I wanted to put into the pie. Well, the first thought that came to mind was to make it a bacon cheeseburger meat pie. Because everything is better with bacon! Just for the record, my meat pie is just that, a meat pie. No vegetables like a pot pie, no potato covering like shepherds pie, and made with ground meat unlike a berry/nut mixture in mincemeat pie. So, over the weekend, I was able to do a little cooking and make my meat pie.

Saturday afternoon, I began by browning the elk burger with chopped onions, mixing in an assortment of spices: salt, pepper, garlic, cumin, red pepper flakes, and paprika. Next I added the turkey bacon we cooked up the night before when we made homemade pizza (my pizza will be a blog entry another day). While I don't mind turkey bacon, it is definitely not the wonder food that cured pork belly is. So, chalk up turkey bacon as mistake number one. I finished cooking up the filling, and let it cool a bit. When I was ready to fill the pie, I added some eggs to act as a binding agent.

After cooking up the filling, I made the crust. My standard pie crust (yet another blog entry) works great in this application, and this time was no exception. Even got to make a few pieces of 'crust', or 'makins' (I think) as my mother calls them. Essentially the leftover crust dough rolled out, cut up, sprinkled with cinnamon and sugar, and baked. Yum! I used to make batches of this in college as my main meal. It was cheap and delicious! Not very healthy though.

So, I rolled out my bottom crust, put it in the pie plate, and started filling it. And filled it some more. Then filled it some more. This was mistake number two. Too much meat filling. The end result was an overly deep pie. After filling the pie, I contemplated the cheese actually going into the concoction. Ultimately, I did not put cheese in. Mistake number three. I think a bit of cheddar would have been really good. But as I was making the pie, for some reason I had a hard time reconciling the taste of dairy with my crust. Oh well, live and learn. On went the top crust, and into the oven!

So, the pie came out, and the boys were quite excited to see what their Dad came up with this time. Especially since they were having 'dessert' for supper! They all love my apple pie, so I suppose they all figured this pie should be great too! Well, the result was definitely edible, but not my best creation.

For starters, the overly thick pie was very filling. None of the boys were able to finish a whole piece. And it was pretty dry too. Guess that happens when you use a lean protein like elk meat. So, I may have to look into making a sauce to go in the pie, maybe a thick brown gravy. But, the boys did say they liked it, so it may be something to keep working on and make again!